Overview of the Frontpage
This is to be seen as a quick walkthrough of how to interact with, and navigate bloks. Once you understand how it works, it will be rather straight forward. First, Bloks support many blockchains, so make sure you navigate over to WAX, which is located on wax.bloks.io.
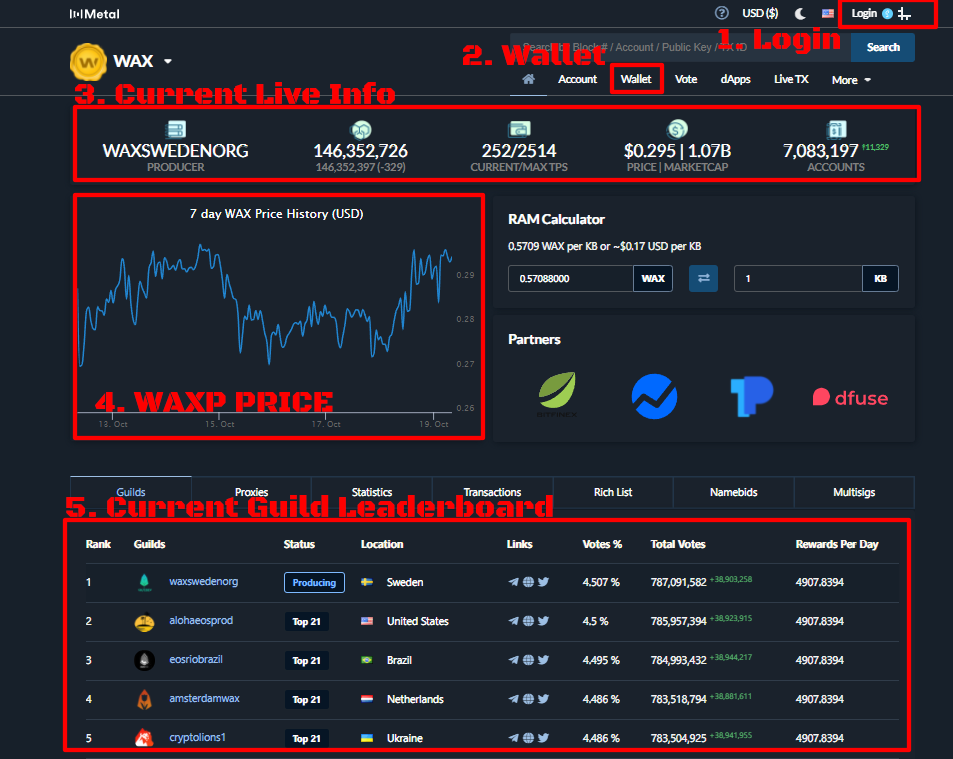
The landing page has a lot of information, but let's notice the more important areas.
1) Login
This is where you can connect your wallet and login to bloks. This enables you to easy navigate your information and utilize all the tools you find on bloks. This is not required to browse information, but it will personalize some functions for you.
2) Wallet
In here, you will find a lot of tools, like staking, unstaking, claiming rewards, buying ram, creating new accounts, changing keys in your account and to transfer WAXP or other tokens.
3) Current Live Info
Here you can see which block is currently being produced by which guild, how many accounts are created in total (7m in screenshot), the current price and marketcap as well as the current Transactions per second.
4) The WAXP Price history
This history is for the last 7 days.
5) The Guilds
Guilds on WAX are the teams that are elected by token holders, reviewed by a 3rd party team called the office of inspector generals, and are responsible for signing all the blocks, providing infrastructure and securing the WAX Blockchain.
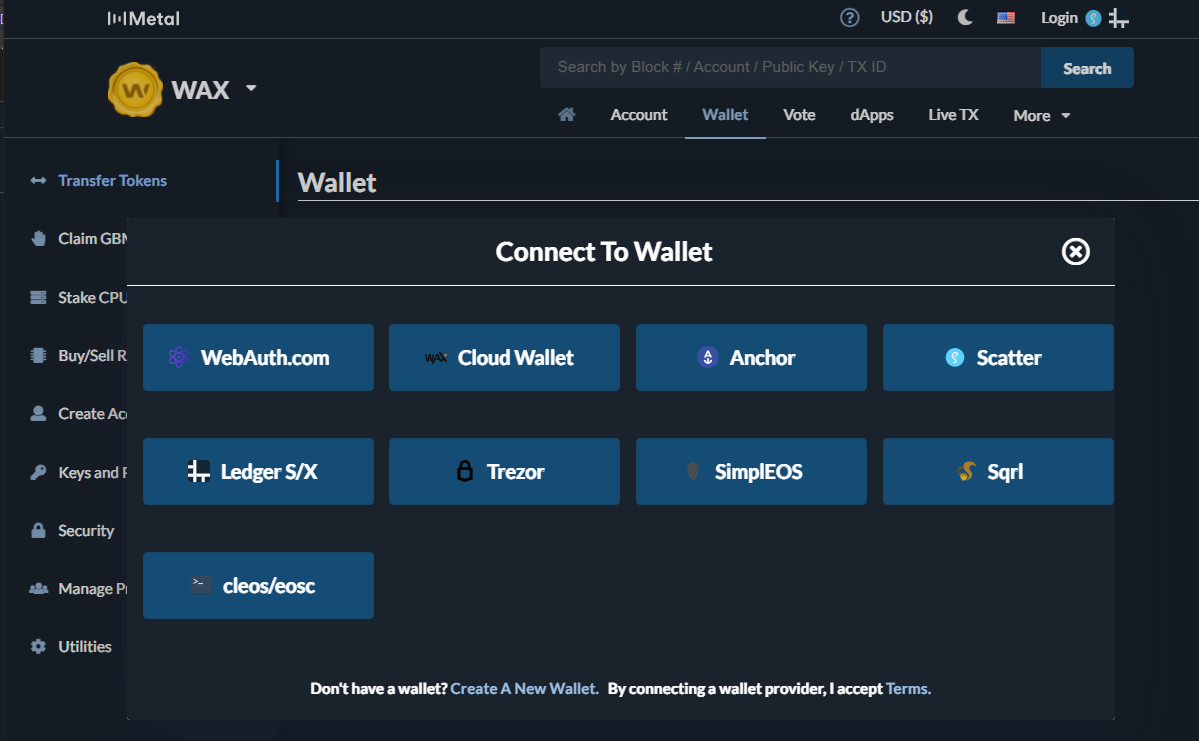
How to log in
First you need to choose which wallet you intend to use to use to login, most likely you will use the WAX Cloud Wallet. Then follow the authentication from the cloud wallet popup. If you are already logged in, you just need to sign an authentication action to provide your account name.
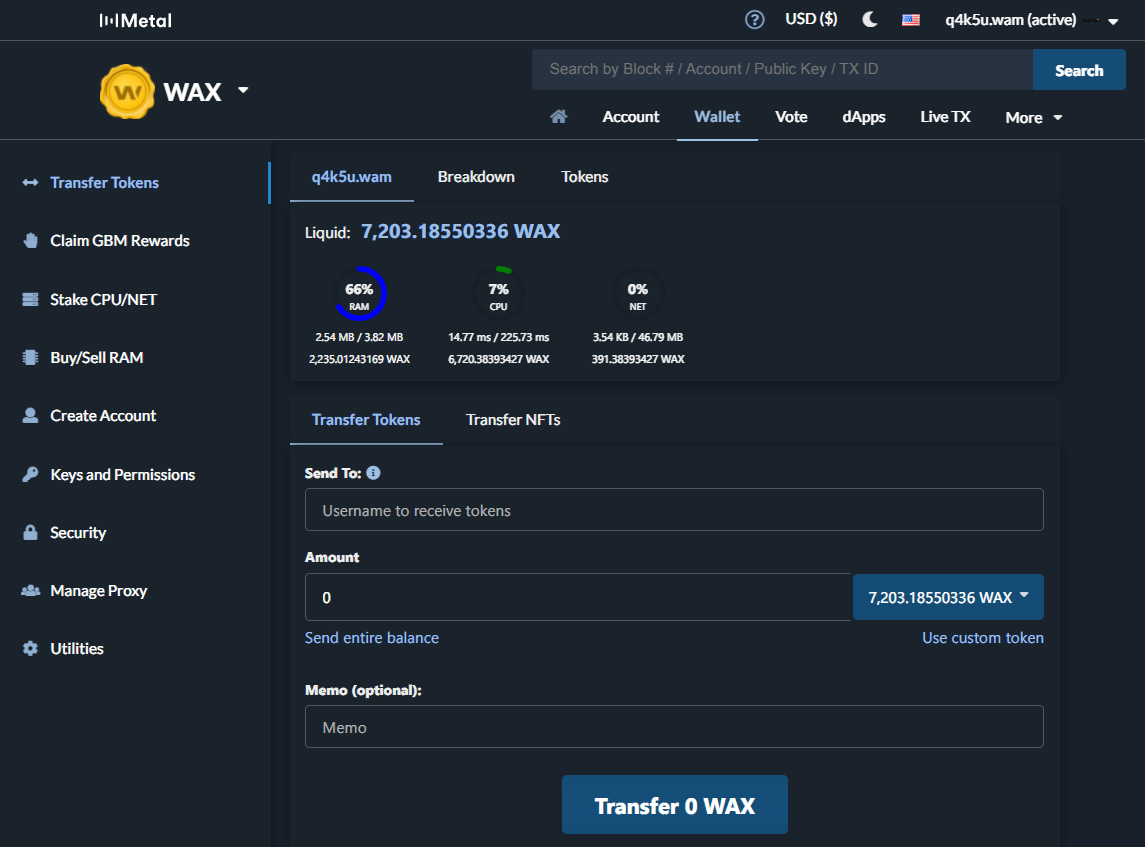
The wallet on Bloks
Inside the Wallet, you will be able to get a quick overview of your account balance, the resources and quickly transfer WAXP to another account. On the left side you will find the actions you can take.
Transfer tokens - Send WAXP or other tokens to other accounts
Claim GBM Rewards - Claim rewards from staking and voting
Stake CPU/NET - Stake & Unstake WAXP For chain resources
Buy/Sell RAM - Buy & Sell RAM, The onchain storage for NFTs, contracts and tokens.
Create Account - Self managed custom named accounts (12 characters, a-z, 1-5)
Keys and Permissions - Change, Add or remove keys from your account.
The last 3 are not relevant for most users.
What many users miss is that if you navigate to one of the areas in the wallet, you will find sub menus on the middle of the screen, in the below screenshot you see "Transfer Tokens" and "Transfer NFTs". Look there for more options inside the wallet.
View your Account Information
This is one of the very neat functions of block explorers, where you easily can get most of the information available on your account. Such as Tokens, Resources, RAM, History and more. You can either navigate to your account through the search bar, or if you are logged in, simply by pressing your name in the top right corner followed by that "View Account" button.

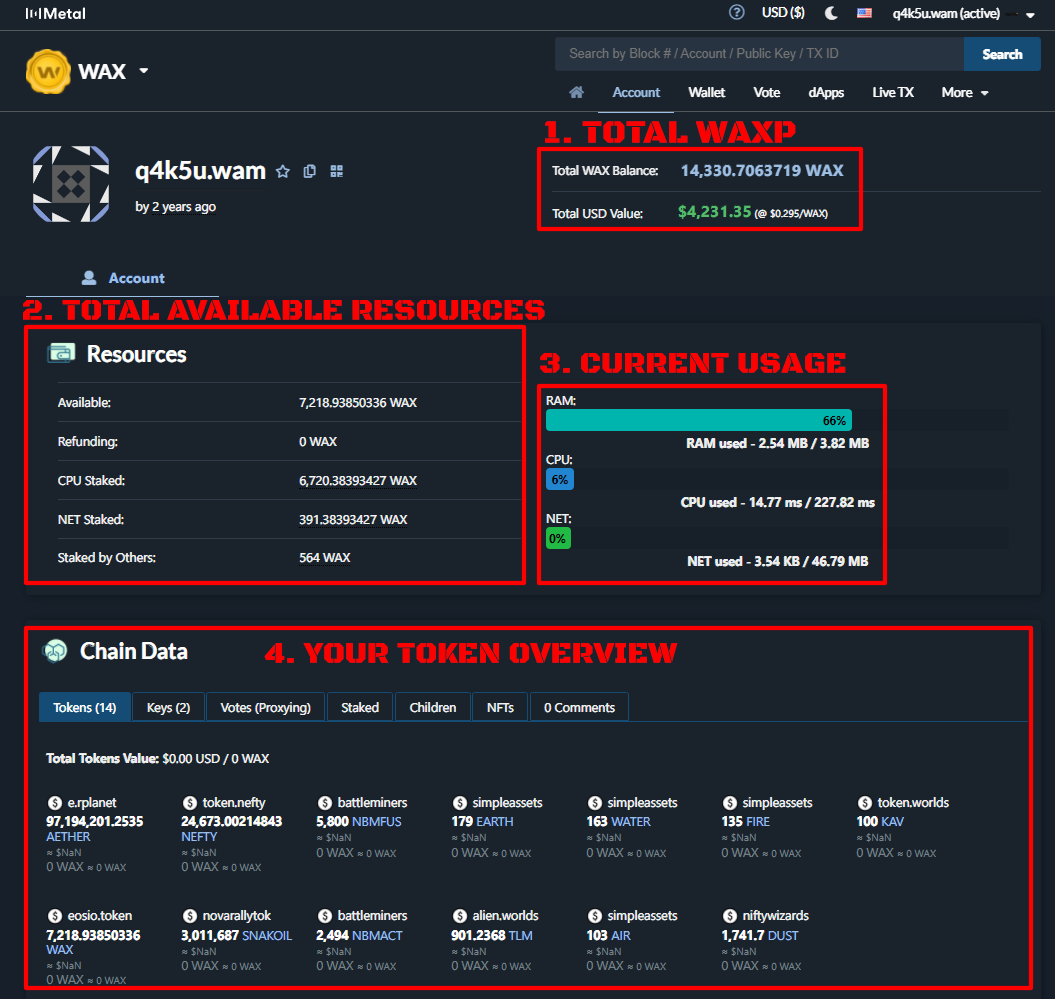
1) Your Total WAXP holdings
Here you will see a quick breakdown of your total WAXP holdings between liquid and staked WAXP. Plus the current market valuation of those tokens.
2) Total Available Resources
Here you will see a breakdown of the WAXP tokens and how they are distributed.
Available - Liquid WAXP
Refunding - Tokens being unstaked (takes 72 hours)
CPU Staked - Staked WAXP for CPU resource
NET Staked - Staked WAXP for NET resource
Staked by others - Other people and services staking WAXP to your account for resources
3) Current Account Resource Usage
RAM - Storage on the Blockchain, That can be Created NFTs, NFT holdings, Table Entries, Tokens in your account etc.
The RAM aspect can be difficult to understand, but you can see it as your locker in the WAXP Blockchain. At some point if you keep putting stuff into it, you either have to remove the trash, or get a bigger locker. You can easily buy and sell ram, but you can never go lower than how much you currently are using. One thing that require RAM usage that people often miss is sale listings on WAX NFT Marketplaces.
CPU - The time it takes to exectue transactions on the Block Producing node,
NET - The Size of your transactions on the Block Producing node.
These resources can be a bit hard to grasp, but hopefully you know more from the Resource management chapters. But in short, CPU is how often you can sign transactions, measured in how long they take to execute on the server where the Block Producer is running their node. And NET is how large transactions you can push. Most likely, if you run out of resources it is because you need to stake WAXP to get more daily CPU time on the Block Producer Nodes.
4) Your Token Overview
Here you will find the majority of the tokens in your account. On some block explorers this information can be limited and some tokens do not show up. This is most often because of the API they are fetching the information from. So do not panic if you don't see a token show up that should be there.
Looking at your Account History
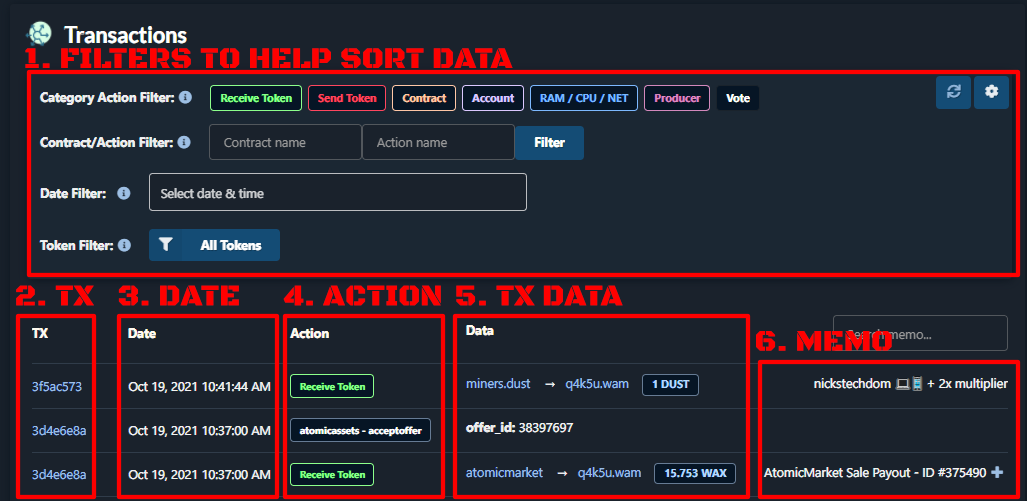
Once you understand what you are looking at, this part is rather straight forward. At times, the filters don't function properly, and some data is not fetched, so do not trust this to 100% when you are filtering stuff. You might want to compare the data between multiple block explorers if it is something highly important, specially if your account has hundreds of thousands of transactions.
The above disclaimer is highly important to understand, but don't read to much into it, the majority of times you look at something it is there and everything is fine. It's just when it's something important you might want to double check with a 2nd source, like a support errand with an exchange, or a transaction that seem to be missing.
The Filters are very nice when you are searching for specific data. You also find more settings for filters on the top right side of the screenshot, I won't go into those in this basic course, but you know they are there.
1) Filter your data
When you master the filters, finding information is way easier. For example, if you want to only see WAXP transfers, you can add the correct token contract name and action. Which is "eosio.token" and "transfer".
By adding this data, you will not see your game actions, which can be helpful if you do interact with a lot of games. You also have the ability to use the Date Filter to narrow down your search even more.
2) Transactions (TX) Hash
Here you will find a link to the full transaction details, where you can find all inline actions, producer that signed the block, timestamp and more. This is perfect to find and link in support issues, as they can quickly see what you mean.
3) Date - Timestamp
The Date field is a way for you to quickly get an overview of what you are looking at. It will help you to locate the correct transaction based on the timeperiod you are searching for.
4) Action and Contract
Here you will be able to really see what is happening on your account. With the contract you can see exactly where you are interacting, and the action is exactly what you are doing. This is a very transparent way for you, or anyone else to see exactly what is going on.
5) Data - What is happening
In the data field, you can get a quick overview of what is happening, in the screenshot you can see that I am receiving tokens from atomicmarket and miners.dust, you can also see that the WAXP I got from the atomicmarket contract is related to the sale I put up on atomicmarket that had the ID: 38397697. So then it is rather easy for me to connect the payment with the sale.
6) Memo
This is an optional field in most transfers, but it is used as an identifier for many smart contracts and exchanges. If you deposit WAXP to an exchange you will have a unique memo that can be viewed here afterwards for you to verify that yes, you did send the WAXP to the correct place.
